1. Open the Approval Route Settings Screen
2. Create Approval Route
- Set "Edit Approval Route at Time of Request"
3. View the List of Approval Routes
4. Check Approval Route Details
5. Edit an Approval Route
6. Toggle Approval Route Public/Private Status
7. Delete an Approval Route
8. Use an Approval Route When Submitting an Approval Request
9. Edit an Approval Route When Submitting an Approval Request
10. Frequently Asked Questions
1. Open the Approval Route Settings Screen
1. Click "Settings" at the bottom left of the screen.
2. Click "Approval Route" within the settings screen.
If the "Approval Route" option is not displayed, access may be restricted due to your current plan or permission settings. Please contact your administrator.
2. Create Approval Route
1. Click the "+ Create New" button at the top left of the Approval Route settings screen.
2. The "Create Approval Route" screen will appear.
Enter the Route Name
・Enter an easy-to-understand name in the "Approval Route Name" field (up to 255 characters).
・Examples: "Construction Completion Report - Approval Route," "◯◯ Site Form Approval"
Set Approval Stages
One or more approval stages are set in an approval route. Approval stages represent the order in which approvals proceed (Stage 1 → Stage 2 → ...).
Add Approvers
1. Click "+ Add approver" inside each approval stage.
2. The "Add approver" modal will appear.
3. Search by name or company and check the members you want to add as approvers.
4. Click the "Add" button to register the selected members as approvers.
Accounts that are suspended or deleted cannot be selected. Accounts on the free plan cannot be selected as approvers either.
Select Approval Conditions
For each approval stage, set the approval condition required to proceed to the next stage.
| Approval Condition | Description |
|---|---|
| All approvers | The next stage proceeds when all approvers in that stage approve. |
| Any One approver | The next stage proceeds when at least one approver in that stage approves. |
Add or Delete Approval Stages
・To add approval stages, click "+ Add approval stage" (up to 20 stages).
・To delete an unnecessary stage, click the trash can icon at the top right of the target approval stage.
・If there is only one approval stage, it cannot be deleted.
Set "Edit Approval Route at Time of Request"
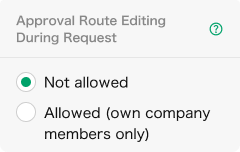
In the panel on the right side of the screen, "Edit Approval Route at Time of Request", you can set whether the requester can customize approvers and approval conditions when submitting the request.
| Option | Description |
|---|---|
| Not allowed | The requester cannot change the approval route contents. The request will be submitted using the registered route as is. |
| Allowed (own company members Only) | Company members can edit approvers and approval conditions at the time of request. |
For how to edit the route when submitting an approval request, see (9. Edit an Approval Route When Submitting an Approval Request).
Save
After completing all settings, click the "Save" button at the bottom of the screen.
Newly created routes are private by default. To make them available for use when submitting requests, enable "Public" on the list screen (see 6. Toggle Approval Route Public/Private Status).
3. View the List of Approval Routes
The Approval Route settings screen displays a list of registered approval routes.
| Column Name | Description |
|---|---|
| Approval Route Name | The name of the route. Clicking it navigates to the detail screen. |
| Approval Route Editing During Request | Displays whether "Not Allowed" or "Allowed (Company Members Only)" is set. |
| Publish | Shows the public/private status of the route via a toggle switch. |
| Actions | Edit or delete options are available from the "…" menu. |
If no routes are registered, "No approval routes available" will be displayed.
4. Check Approval Route Details
1. In the approval route list screen, click the row of the route you want to check.
2. The "Approval Route Details" screen will appear.
You can check the following information on the detail screen:
・Route name
・Table of each approval stage (stage number, approval condition, approvers)
・Setting status of "Edit Approval Route at Time of Request"
The top right of the detail screen has "Edit" and "Delete" buttons.
5. Edit an Approval Route
Edit from the List Screen
1. In the approval route list, click the "…" menu in the row of the route you want to change.
2. Select "Edit".
Edit from the Detail Screen
1. Click the "Edit" button at the top right of the approval route detail screen.
Operations in the Edit Screen
・The edit screen layout is the same as the new creation screen.
・You can change the route name, approvers, approval conditions, approval stages, and "Edit Approval Route at Time of Request" settings.
・After completing changes, click the "Save" button to save.
・To cancel changes, click "Cancel".
If you try to leave the screen while editing, a confirmation message saying "Changes have not been saved" will appear.
6. Toggle Approval Route Public/Private Statu
By toggling the public setting, you can control whether the route can be selected when submitting approval requests.
1. In the approval route list screen, click the toggle switch in the "Public" column of the target route.
2. When the switch is On (Public), the route can be selected during approval requests.
3. When the switch is Off (Private), the route will not be shown during approval requests.
Newly created routes are private by default. Making a route private does not delete it. You can make it public again anytime to use it.
7. Delete an Approval Route
Delete from the List Screen
1. In the approval route list, click the "…" menu of the route you want to delete.
2. Select "Delete".
3. In the confirmation dialog, click "Delete".
Delete from the Detail Screen
1. Click the "Delete" button at the top right of the approval route detail screen.
2. In the confirmation dialog, click "Delete".
Deletion cannot be undone. Please make sure the route is truly unnecessary before deleting.
8. Use an Approval Route When Submitting an Approval Request
Open the approval request modal.
In the "Approval Flow" section, choose from the following two methods:
"Use Approval Route" — Submit by selecting from registered approval routes.
"Specify approvers Individually" — Submit by specifying approvers one by one as before.
If you select "Use Approval Route":
Search and select a route from the "Select Approval Route" dropdown.
When a route is selected, a list of approval stages and approvers will be displayed.
Only public approval routes can be selected. If no usable approval routes exist, the message "No available approval routes. Please specify approvers individually." will be shown. If there are suspended or deleted members among the approvers, a warning message may appear, and you might not be able to submit using that route.
9. Edit an Approval Route When Submitting an Approval Request
If "Edit Approval Route at Time of Request" is set to "Allowed (Company Members Only)" when creating the approval route, company members can customize the route content at the time of request.
1. Select an approval route in the approval request modal.
2. Click the "Edit approval route" link displayed at the top right of the approval route details.
3. The "Edit Approval Route" dialog will appear.
4. Add or remove approvers, change approval conditions, etc.
5. When changes are complete, click the "Application" button.
Editing the route at the time of request is a temporary change limited to that request only. The original approval route settings are not changed. If "Not Allowed" is set, the "Edit Approval Route" link will not be displayed.